为什么要运行自己的中继?
通过端口转发将主力 PC 暴露在互联网上存在安全风险,让它全天候开机也浪费电力。一台小型 Linux 服务器或 Raspberry Pi 中继可为您带来最低的延迟、无需向所访问的 PC 做端口转发、更低的功耗、无需担心第三方服务器的 GDPR 问题,以及从网络外部 Wake‑on‑LAN。即使中继遭到攻击,经过它的所有数据也都使用服务器永远不会持有的密钥加密。
本指南假定您已拥有 Linux 机器的 SSH 访问权限和必要的权限。
Remotly Relay Server 第 2 版新增了对 TLS 和访问密码的支持。即使不启用 TLS,每个连接也都通过 RSA-4096 和 AES-256 端到端加密;TLS 为严格的防火墙环境增加一层冗余传输加密,代价是额外的 CPU 开销。访问密码可防止发现您服务器 IP 和端口的陌生用户使用它。
1. 选择适合您设备的软件包
在服务器上运行 uname -m,并根据结果下载对应的软件包:
- x86_64 — Linux amd64(64 位 Intel/AMD 服务器和 VPS):remotly‑relay‑linux‑amd64-v2.zip
- aarch64 — ARM64(运行 64 位系统的 Raspberry Pi 3、4 和 5,ARM 云实例):remotly‑relay‑linux‑arm64-v2.zip
- armv7l — 32 位 ARM(运行 32 位 Raspberry Pi OS 的 Raspberry Pi 2、3 和 4):remotly‑relay‑linux‑arm7-v2.zip
不支持 Raspberry Pi Zero 和 Raspberry Pi 1(ARMv6)。
2. 安装
- 通过 SSH 连接到服务器(例如使用 OpenSSH、WinSCP 或 FileZilla)。以下所有命令均在服务器上执行。
- 下载适合您架构的软件包,例如 ARM64:wget https://downloads.mirillis.com/files/remotly‑relay‑linux‑arm64-v2.zip
- 解压:unzip remotly‑relay‑linux‑arm64-v2.zip — 如果缺少 unzip,请使用 sudo apt‑get update && sudo apt‑get install unzip 安装。
- 将文件移动到服务所需的 /srv/remotly:sudo mv remotly‑relay /srv/remotly
- 设置所有者和权限:sudo chown -R root:root /srv/remotly && sudo chmod -R 755 /srv/remotly。配置文件包含密码,请将其设为仅 root 可读:sudo chmod 600 /srv/remotly/config/remotly‑relay.json
uname -m
wget https://downloads.mirillis.com/files/remotly‑relay‑linux‑arm64-v2.zip
unzip remotly‑relay‑linux‑arm64-v2.zip
sudo mv remotly‑relay /srv/remotly
sudo chown -R root:root /srv/remotly
sudo chmod -R 755 /srv/remotly
sudo chmod 600 /srv/remotly/config/remotly‑relay.json
3. 配置
编辑配置:sudo nano /srv/remotly/config/remotly‑relay.json。如有可能,请使用标准 HTTPS 端口 443,它最容易穿过防火墙。
非 TLS 配置:
{
  "tlsEnabled": false,
  "key": "",
  "cert": "",
  "forceTLS": false,
  "domain": "",
  "port": 443,
  "max_bandwidth": 40000000,
  "allowed_bandwidth": 30000000,
  "password": "PasswordPasswordPasswordPassword"
}
TLS 配置(将 forceTLS 设为 true 以仅允许 TLS 封装的连接):
{
  "tlsEnabled": true,
  "key": "/etc/letsencrypt/live/relay.example.com/privkey.pem",
  "cert": "/etc/letsencrypt/live/relay.example.com/fullchain.pem",
  "forceTLS": false,
  "domain": "relay.example.com",
  "port": 443,
  "max_bandwidth": 40000000,
  "allowed_bandwidth": 30000000,
  "password": "PasswordPasswordPasswordPassword"
}- tlsEnabled——启用额外的 TLS 加密;设为 true 时需要有效的 cert 和 key 路径。
- key——证书私钥(PEM 格式)的绝对路径,例如 /etc/letsencrypt/live/relay.example.com/privkey.pem。
- cert——完整证书链(PEM 格式)的绝对路径,例如 /etc/letsencrypt/live/relay.example.com/fullchain.pem。
- forceTLS——设为 true 时仅接受 TLS 1.2 / 1.3 连接;客户端和主机端都必须使用 TLS。
- domain——在 DNS 中分配给中继 IP 的域名(推荐设置,用于 SNI)。
- port——中继用于通信的端口。
- password——至少 32 个字符以限制访问;留空则不使用密码运行。非空但过短的密码会导致服务器无法启动。
4. 启动服务
- 注册 systemd 服务:sudo bash /srv/remotly/script/installremotlyrelay.sh
- 启动服务:sudo bash /srv/remotly/script/startremotlyrelay.sh
- 检查是否正在运行:systemctl status remotly‑relay 应显示 active (running)。
sudo bash /srv/remotly/script/installremotlyrelay.sh
sudo bash /srv/remotly/script/startremotlyrelay.sh
systemctl status remotly‑relay

# to stop
sudo bash /srv/remotly/script/stopremotlyrelay.sh
然后在浏览器中打开 http://<relay IP>:<port>/connectionTest(启用 TLS 时为 https://<relay domain>:<port>/connectionTest)。您应该会看到消息 OK。
该服务随系统启动。修改配置后请再次运行启动脚本(它会重启服务);stopremotlyrelay.sh 用于停止服务。日志位于 /srv/remotly/logs/remotly‑relay.log。
5. 在账户中注册中继
登录 remotly.com,打开 Custom Relays(自定义中继)并点击 Add relay server(添加中继服务器)。填写 IP 地址、remotly‑relay.json 中的端口、在应用中显示的设备名称、国家代码,以及与配置文件中相同的密码。

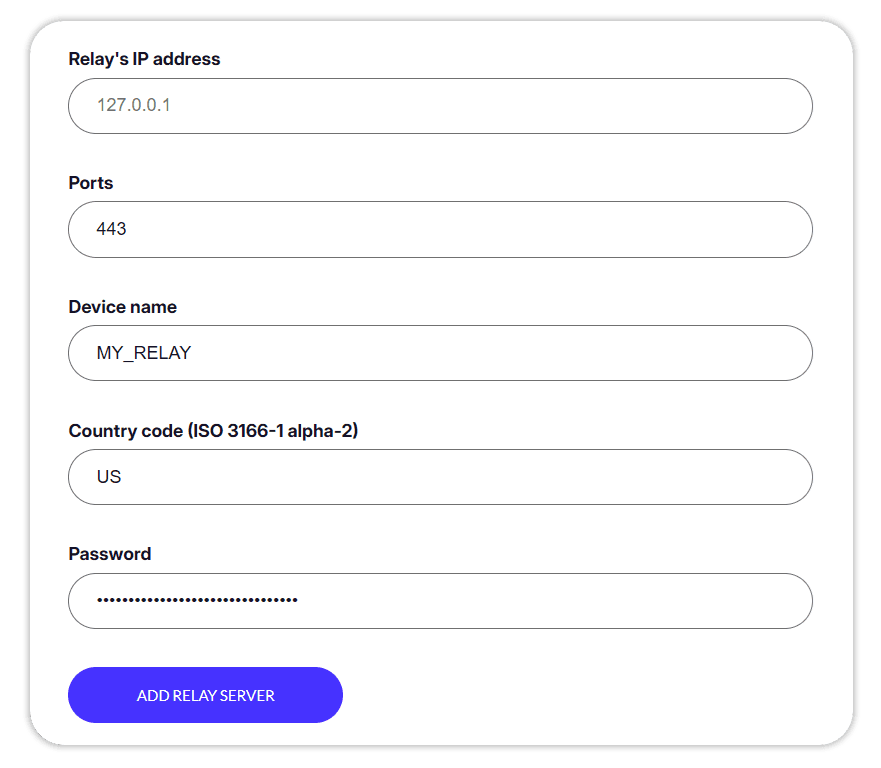
启用“强制使用 Connect Anywhere”连接到另一台计算机时,您现在应该只会看到您私有中继的国家代码和名称。
故障排除
- connectionTest 显示 OK 但中继连接失败:您的服务器可能无法从网络外部访问。请在公网 IP 上配置端口转发,并从外部浏览器测试。
- connectionTest 显示 OK 但连接经过 Remotly 官方中继:您尚未在 Web 面板中将自定义中继添加到账户。
- 中继正在运行但 connectionTest 无法访问:在网络内部,检查服务器防火墙是否阻止了中继端口;若仅外部无法访问,请修复路由器上的端口转发。
有疑问?请访问 Remotly 社区。